ERECTING THE DRYER
The Dryer needs a flattish space of 2.7 x 2.7 metres. Pitch it across the prevailing wind for an indirect through draught. Anchor with the steel pegs, even when trying out different places. If you wish to erect it in some other way, on a hard surface for example, suggest consult us first.
First check your inventory and tell us of any problems. We’re very keen to help. Please give the steel a quick wipe down before you start. Assembly is easier with two people, especially if one at least is “handy”.
Inventory
Brundle despatch the 26.9 x 3.2 mm wall galvanised tubes for the frame:
| 1 no ridge | 2700mm |
| 2 no ground rails | 2644mm |
| 4 no legs | 2313mm |
| 4 no anchor pegs | 500mm |
We send the rest by Parcelforce:
Galvanised tubeclamp joints:
- 4 no elbows
- 4 no swivel tees
- 4 no crossovers
- 1 no hex key
Covers and lines:
- 1 no cover of 450gsm pvc coated polyester, lacquered both sides, fire retardant, UV stabilised, fungicide
- 4 no lines, total 46 metres, of 5mm white polycore
- 2 no blue ropes, 4mm polyprop
- 10 no toggles, 8mm elastic
Frame
1. Fit the crossovers to the ground rails, then use the elbows to connect them to the legs. Don’t over tighten the grub screws for now, to allow later adjustment.
2. Use the swivel tees to connect the ridge to the legs.
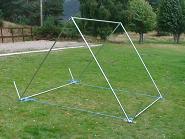
3. Erect the frame, and anchor the ground rail on one side by tapping two pegs halfway in. Then use the blue ropes to pull the other rail in until width to centres is about 2700. The diagonals should be about 3820. A small batten under the corners keeps toggles off the ground. Adjust the crossovers and hammer in the pegs. Tighten all the grub screws, and retighten them every year.
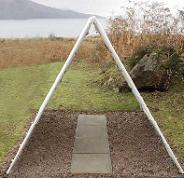
4. Later, concrete in the anchors if you wish. For a clean surface for shoes and fallen clothes, perhaps make a path of 4 x 600 x 600 slabs with a membrane under gravel within garden edging to stop weeds.
Cover

1. Avoid a windy day if you can. Roughly centre the cover along the ridge.

2. Unfold the cover to the ground and check that it is roughly centred.
3. Toggle the middle of each side, check all is centred, then do the rest.

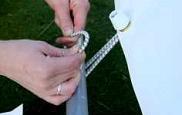
4. Each side has 8 eyelets, and takes 2 lengths of line, each doing 4 crossings. Thread a line through the fourth eyelet down, on either side, from the back, putting a knot in the end as a stopper.

5. Then thread the other eyelets: across, through from front to back, up then through from back to front and so on. At the last eyelet, tie a loop about 600 mm from the end of the line to help with tensioning.